home tutorials features parties custom orders

Saturday, July 27, 2013

Baby Wash Cloth Tutorial

Several weeks ago, a friend commissioned me to make three baby gift sets that included an embroidered burp cloth, embroidered bib, and a baby wash cloth.  While I have made several burp cloths and bibs before, I had never made any wash cloths.  But really, how difficult could it be to make a wash cloth?!  I mean, it's just a square piece of fabric!

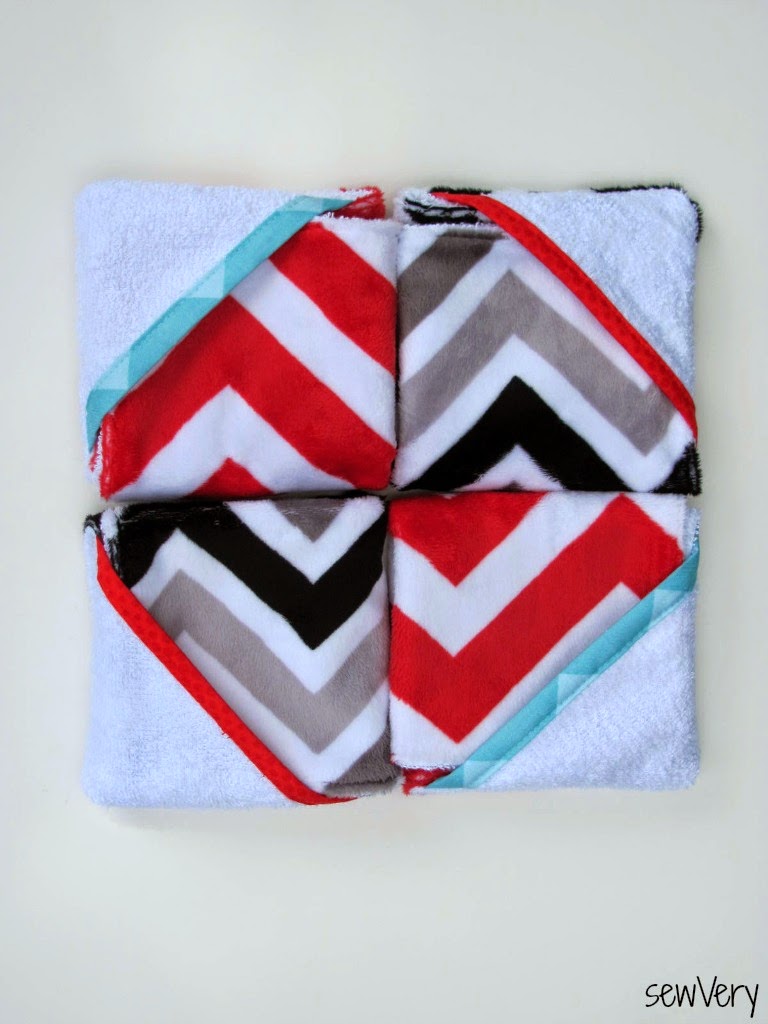
The baby gift sets were being made with white terry cloth and chevron Cuddle fabrics provided to me courtesy of Shannon Fabrics, so I wanted to figure out a unique way to make the wash cloths a mix of both of these wonderful fabrics.  In doing so, I put together A sewVery Simple Baby Wash Cloth Tutorial!


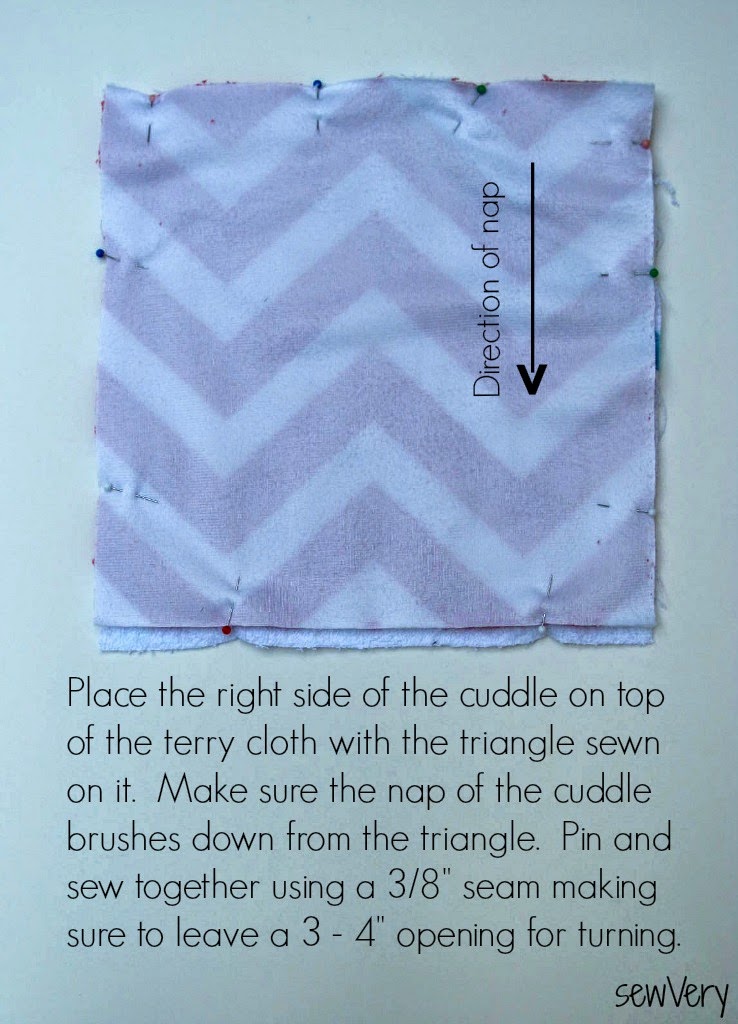
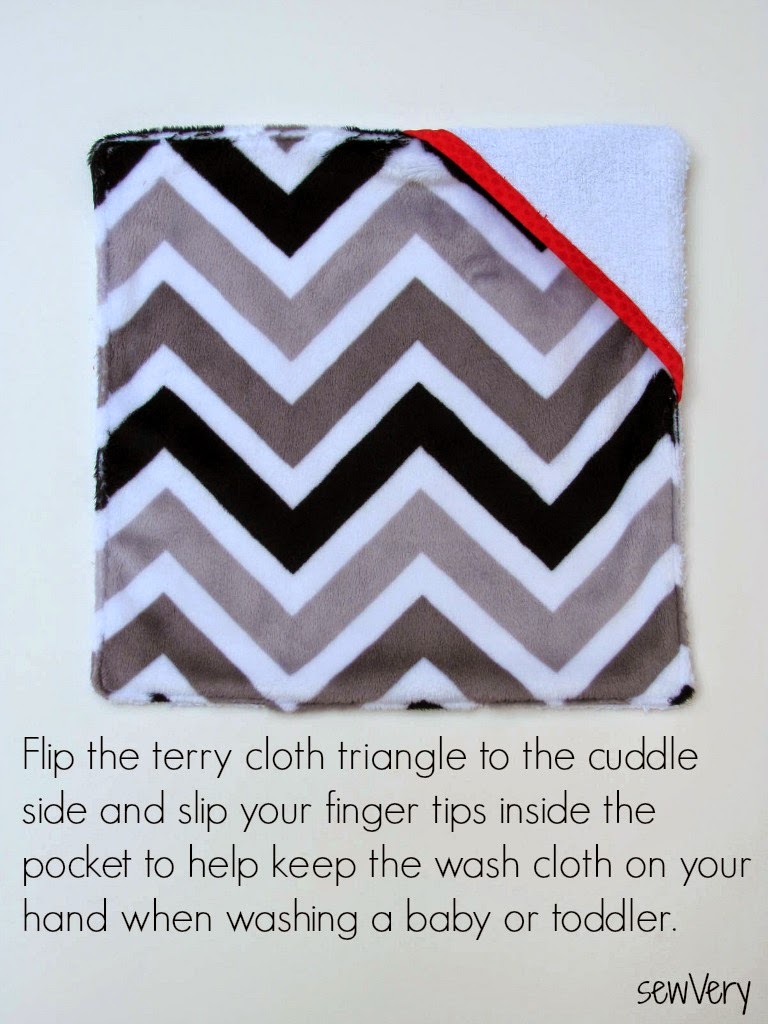
I designed the baby wash cloth to basically be a mini hooded towel for your hand.  By simply adding this triangle of terry cloth to the design, you can be sure the wash cloth stays on the palm of your hand while washing a baby or a toddler.  It works by sliding your fingertips into the wash cloth pocket instead of having to fold over the end of the washcloth.  And the way the pocket is sewn onto the wash cloth, you can flip it to either the terry cloth or the Cuddle fabric side.


The terry cloth is soft and not too thick, making it ideal to couple with the thicker Cuddle fabric, and both are super absorbent.  Another great thing about Shannon Fabrics is that they offer a wide variety of Cuddle prints and textures instead of just the basic embossed dot design you find at chain fabric stores. These Cuddle fabrics are super soft and are much easier to work with than the minky you find in other stores.  I found that the Shannon Fabrics' Cuddle didn't stretch or slip and slide as much when I sewed with it, making it a cinch to sew together these baby wash cloths!

Ready to make several for baby gifts or to use at home with your own kids?  Then let's get started!


It's that simple!  My kids love using these in the tub, especially if they have a boo-boo that they are particularly sensitive about washing.  Which reminds me, I need to make them some more and a few extras for baby gifts!


If you like my tutorial for A sewVery Simple Baby Wash Cloth Tutorial, then I hope you'll decide to follow my blog to see what other fun projects I'm making and new tutorials I'm developing.

Follow on Bloglovin


Thanks again to Shannon Fabrics for providing me with these terrific fabrics!  To see more Cuddle projects and inspiration, check out their blog at My Cuddle Corner.  You might just see my coordinating burp cloth tutorial there soon!   

Friday, July 19, 2013

The Cottage Mama Pattern Tour: Miss Matilda Dress

My dear, talented friend, Lindsay aka The Cottage Mama, recently released four new patterns in both pdf and paper formats.  If you're not familiar with Lindsay's work, let me tell you, you are missing out! Lindsay has a knack for not only designing classic children's clothing, but she knows how to combine modern fabrics and trims in a way like no other!

I was fortunate to test one of her latest dress patterns, The Miss Matilda Dress and Top PDF Pattern, for Ella, and this dress has quickly become a favorite at my house!  I just love this picture of her. She looks like such a little lady!

Disclaimer:  The pattern was provided free of charge to me in exchange for testing it; however, all opinions stated in this post are 100% my own.


The Miss Matilda Dress and Top Pattern has a very classic style and is a well written pattern accompanied by lots of color photos and excellent instructions.  The final product definitely looks like a boutique design.  

I tested a size 5 of View A of the dress which includes the full ruffle around the neckline and down one side of the button placket on the bodice plus the attached sash.  


However, the pattern includes two other options:  View B is for a top with only a neck ruffle and sash while View C is for a dress with no ruffles.  Plus all views can easily be embellished with trims and piping to make the piece even more unique.

I agree with Lindsay's difficulty rating that a confident beginner could accomplish this, and for an experienced sewer, it only takes an afternoon to complete from start to finish.


Ella reports that this dress is very comfortable and makes her feel good when she wears it.  I think she looks sophisticated and quite beautiful.


The fabrics I used are all cotton, but I could not find the selvedge of the floral print to tell you what it is. The lilac and pink with a touch of blue/green is very sweet and reminds me an Easter dress!


For Fall, I think I'll make the View B version top without any ruffles to pair with capris or pants.  I really like the top test versions everyone made.

Be sure to check out Lindsay's shop to purchase either the pdf or paper versions of all her patterns. Below are the links to the newest pdf patterns in The Cottage Mama Shop.


Hope you'll decide to follow along the Cottage Mama Pattern Tour and visit all the other lovely bloggers that are sewing up these wonderful patterns!


Thanks for stopping by, and I hope you'll continue to follow along on my sewing journey!

Follow on Bloglovin

Wednesday, July 17, 2013

Baby Gift Set

A few months back, I made this quick little baby gift set for a family friend.  I've been meaning to share it with you all forever!


These bibs and the burp cloth were actually my first attempts at making baby gear.  They are relatively simple to construct and just take a little time with cutting out and piecing together the different fabrics. I highly recommend making several of these at a time so you'll have a baby gift on hand when you need a shower gift for a friend, family member, or co-worker!

For the baby bibs, I used the free bib pattern from Gingercake.  I highly recommend it and have used it a number of times since I made these.


The burp cloth is approximately 10" x 18".  I was inspired by one I saw on Clover & Violet where you can also find another free bib pattern that I have used.

On all three pieces, I used quilting cotton for the front and minky fabric for the back with a layer of cotton batting in between.  When working with this combination of fabrics and batting, you will definitely want to use a walking foot on your sewing machine.

When I made this set, I used the pattern piece and cut out the shape of the bib in the cotton, batting, and minky.  Big mistake!  You see, the minky I used here was the kind you buy at Joann's, and while the quality is good, the fabric has a lot of stretch to it.  Since making this original set, I've learned a couple of easier ways to assemble these.

First off, use higher quality cuddle like the kind made by Shannon Fabrics.  Secondly, cut your cotton, batting (which is optional), and minky into rectangles and then trace the bib pattern outline onto the wrong side of your cotton fabric with a water soluble pen.  Layer the fabrics with the batting on bottom, then the minky right side up, and finally the cotton wrong side up.  Pin together like crazy all the layers and then sew them together following the bib pattern outline making sure to leave a 3 - 4" opening for turning.  Cut away the excess fabric, clip corners, turn right side out, tuck in the edges of the opening, and topstitch around the entire bib.

To finish the bib, sew on 1" square pieces of velcro for the closure.

When sewing the burp cloths, I recommend putting together the layers similarly to the method I described above for the bibs.  Don't cut out the curved edges before sewing it all together.  Instead, trace the curved corners onto the wrong side of the cotton fabric and use that as a guide when sewing. Trim away the excess when finished.

You can see other baby gifts I've made, which include more bibs, burp clothes, baby shoes, ruffle bum rompers, and a sun hat, here and here.

And coming soon, I will have a free tutorial for a monogrammed terry cloth and cuddle fabric combination burp cloth!  You won't want to miss it!

Follow on Bloglovin

Tuesday, July 9, 2013

I've Lost my Biggest Fan

Some of you may have noticed I've been absent from the blogging world the last few weeks.  At first, the reason for my absence was I became sick, then once I was feeling better, my family went on vacation. However, a day after we returned from our trip, my father was found dead in his home from an apparent heart attack.

My father was my biggest fan.  He read every single post I ever wrote, commented on a lot, and bragged about me and my sewing to all his friends and family.  He loved seeing pictures of his grandchildren and after I searched the photos on his computer, found pictures he had downloaded from my most recent blog posts.

My dad was supportive of my hobby and my dream to someday develop my love of sewing into a career through design.  Like any parent, he wanted me to be happy.

It's been a rough couple of weeks since he passed, and I know the months ahead will be difficult as I deal with the grief of his loss and the responsibility of taking care of and sorting through his belongings.  I am not new to this at all.  This will be the third time in the last 14 years that I have had to clean out a close relative's home.

So, just to let you know, I will be blogging in the coming weeks, but until I get a handle on things, I am sure it will be sporadic.  Right now I want to sew but am finding it difficult to actually muster up the energy to do it.

I miss my daddy.  May he rest in peace.